|
WHAT
SKILLS ARE NEEDED TO DRAW
EVERYTHING?
edges
| cross contour | size
angle proportion perspective | shading
| negative space |
holistic gesture seeing and drawing | color | pattern texture
Once students learn these skills, they can draw anything that
they can
observe. I recently ran across and old tape and enjoyed listening
to a talk by Betty Edwards at
Calvin
College in the 1980's. Among other things, she lists some skills that
are
needed
to be able to draw. This list of observation skills is
inspired
by hearing her ideas about things that students need to learn to see in
order to observe and draw better. Visual observation is believed to be
in the domain of the right side of the brain. Intuitive and creative
thinking are also believed to be in the domain of the right
brain. The left
brain deals with the rational, the alphabet, numerals, and so on.
Left brain thinking is linear - one thing after another. The right
brain
processes everything at once. 1
how
to see edges
To draw well, students need to learn to see the edge or contour of
things.
I teach this using 8 x 8 blinder cards on the top of the drawing
hand.
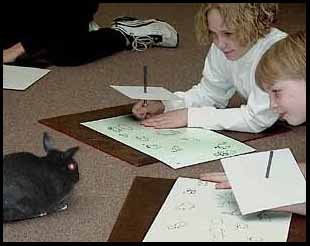
Right:
Here third graders are doing an
introductory
warm-up by drawing some bent wire.
This
is followed by viewing a live rabbit. 2
Below:
With the blinder still on their pencils, they draw the rabbit's outline
(see result below). When it moves, they continue drawing.
They
follow the movement. The poor left brain gives up and goes home.
This is right brain practice. It is a fun activity and it builds
knowledge and confidence about how to draw.
|
|
Below:
When the rabbit moves they are encouraged to keep drawing.
 |
|
 |
how
to see cross contour
To draw well, students need to learn to see the cross-contours of
things.
Cross-contour is easier to see if there are lines that go across the
form and
help show the form, like horizontal stripes on a blouse. The top
of a water glass is easy to see as an oval, but the bottom is hard to
see
other than a straight line for some observers. Before drawing, I
ask them to study the relationship between the observed top and bottom,
but I do not illustrate it with a drawing for them. I ask them to
practice with a finger in the air, etc. before putting lines down on
paper.
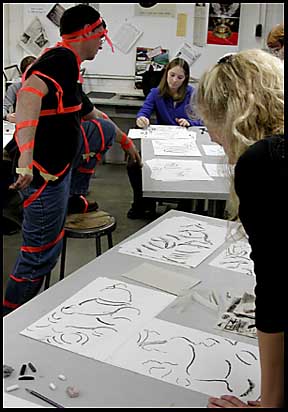
Left:
Here the model is wrapped in dayglow orange to create an easy way to
see
cross contour. In this session students are instructed to draw only
the ribbon. Black compressed charcoal is quick and
expressive. This
method makes observational figure drawing less frightening and easier.
This method makes it impossible for the left brain to impose a standard
saved "person image". Nobody reverts to a "stick person". The left
brain
bows out and the right brain gets a chance to get some practice and
confidence.
how
to see sizes - angles - proportions
To draw well, students need to learn to see size relationships, angle
relationships,
and the relationship of different negative space sizes. We can
teach
this
using sighting devices and techniques. |
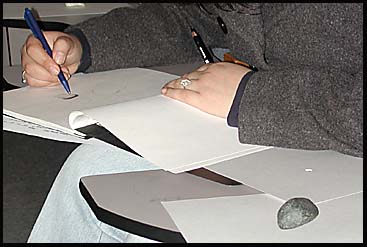
Below:
Students learn to measure and compare lengths, proportions, angles, and
so on by sighting. They hold a ruler or pencil at arms length
while
making comparison observations. These measurements are transferred to
the
paper.
A viewfinder is another useful
sighting device
to help see the angles and proportions of things being observed.
This category includes linear perspective which can be learned by
making
careful comparisons of sizes and angles.
By using two sticks (like chop sticks, pencils, or rulers) and holding one in line with a vertical corner and crossing it with another stick that lines up to a horizontal line, students can draw in perspective and learn to observe the principles of linear perspective. The sticks must be kept together in the observed position while placing them on the paper and transferring the observed angles to the paper.
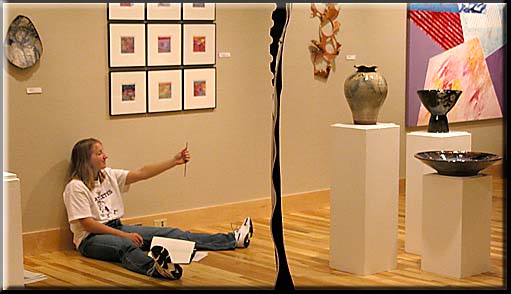
Above:
Catie Froese uses a ruler to make sightings to determine
proportions
of pottery by Marvin Bartel
|
|
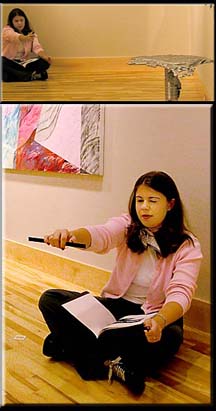
Above:
Suzi Arsenovic uses
a ruler to make
sightings of an aluminum table by sculptor John Mishler
|
|
how
to see shading
To draw well, students need to learn to see highlights,
shading, and
cast shadows. Directional light on still life objects that are
painted
all white and placed on white makes shadows and shading easier to
see.
I require them to first find the lightest part and keep that area of
paper
white. They then find darkest areas. Then middle tones,
etc.
I ask them to use a light pencil outline around the shape of the
highlight.
Then students add ball-point hatching and cross-hatching for
tone.
When finished they must erase the
pencil to see the form without the
outlines.
The watercolor painting below shows this. If they include some
negative
space tone, the drawing will pop out without the artificial outlines.
|
 |
Directional
lighting makes shading easier to observe. Negative space can be a
contrasting tone to make it easier to see that form can show up without
any outline after the outline is erased. |
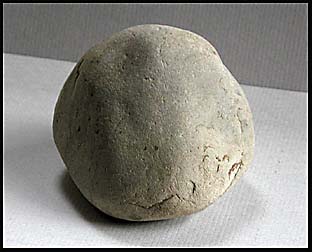
Student
draws a pebble with pencil - shades it with ball-point - then erases
the
pencil.
|
how
to see negative spaces - negative shapes
To draw well, students need to learn to see negative shapes and
spaces.
I tell students that good objective seeing requires that we get over
our
prejudices. Out left brain is prejudiced to be practical and
ignore
the negative spaces. We learn to pay attention to things that
might
effect us and we ignore the empty space. To teach about negative
space, I ask them to draw only negative (background) areas.
Positive
parts are sometimes added after the negative parts are all finished. A
viewfinder is helpful to give definition by framing the space.
One assignment has them looking at winter tree branches and
only drawing
the sky shapes between the branches. They may not draw any of the
overlapping crossing lines of the branches. If any extra lines
are included, they are asked to erase them.
Another assignment has a bunch of sunflowers in a vase places
in front
of a dark brown or black paper background. Viewfinders are used
by
the students to frame compositions tightly limiting the amount of
negative
space showing. Students are asked to use a soft lead drawing
pencil
to gesturally tone in the dark background first, then tone in the value
of the green leaves and stems (middle tones), and lastly define
the
tone and patterns of the centers of the sunflowers, leaving the yellow
flower petals the color of the paper with nearly no tone and only a bit
of outlining of the petals, paying special attention to some deformed
or
somewhat mutilated petals. Using pale yellow paper might lend itself to
this drawing. A Vincent van Gogh sunflower painting could be
studied after
students have finished this drawing.
By changing their habits of work students can learn how to
acquire new
skills. Students learn how to learn to acquire
observation
skills because they now know how to practice on their own time.
For this reason I refrain from demonstrating these techniques for the
class. Instead, I assign preliminary practice routines. I
do not want them to feel that they need an expert artist to
figure out how things look. It is more important that they need
to learn how to figure things out themselves.
how to see holistically & draw expressively
GESTURE drawing practice helps us learn to see and express more holistically and globally, but it is still very observational, even as it is highly emotional. While gesture drawing, we practice trying to see and capture everything at once. We avoid outlines all together, starting in the heart of the thing being observed and portray its overall essence as instantaneously as possible. The Gesture Drawing Dance section of Motivating Non-Drawing Students has more specific methods of teaching gesture drawing. Also see the Inside-Out Gesture section of Portrait and Figure Drawing. In my opinion, some the strongest drawings by artists like Kollwitz and Rembrandt use an inspired combination of gesture and contour. Of course, I would never show these to students prior to their practice. An inventive and creative mind is not nurtured by imitating experts. It is nurtured by playing, experimenting, discovering, and expressing its own observations and its own feelings--not those seen in another artist's picture. As a teacher, I am challenged by seeing the work of these great artists. I want to find ways for my students to practice and learn the kind of routines that rehearse these skills of direct immediate observation, of rich imagination, of memory, of feeling, and of expressive drawing skills. I use my imagination as an artist to experiment with ways for students to practice and so they can learn to see and express themselves more like artists do (from within based on what they observe, feel, think, imagine, and so on).
how
to see color
Although color is not always associated with drawing, it can lend
itself
to similar right brain practice. Color also provides its own
excitement
and sensory motivation. When learning observation, I ask students
to observe specific color changes created by lighting and reflected
light.
A red reflector card placed near a still life set up will create a
different
effect than a blue reflector card. Colored filters and colored
lights
are also useful. This category can include atmospheric
perspective
which can be observed if distant colored objects can be compared with
similar
colored close-up objects on location in a landscape setting.
|
Watercolor
Veggies Lesson
This one
hour watercolor
sketch was done by a student who has learned to attend to the
observation
of the subject. Plain white light was used to light this setup.
Before the lesson
The
color sketch
on the right is done after doing color experiments using similar
watercolor
paper and pan paints.
In
the preliminary
preparation students experiment with color mixing without any visual
guide.
They are asked to wet areas by brushing water on the paper while not
looking
at the paper. During this part they are observing the negative
shapes
between the fingers of their opposite hand being held in front of their
faces.
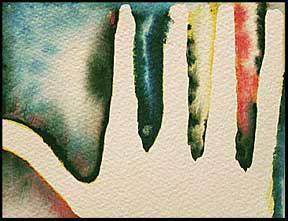
This
is a preliminary study on a small piece of watercolor paper.
Students
are given specific verbal instructions about how to wet the paper while
looking at their opposite hand being held in front of them. Only
the negative spaces are wet and only the negative spaces are colored in
this picture. The dry area are sometimes used for comparison, for
drybrush, and so forth.
Next they place pure
primaries on the wet areas near dry edges. They then have to say
what they discover as colors overlap. By experimentation, they
have
to figure out how to produce every color including brown.
I
never demonstrate this. They must each do it individually from
verbal instructions.
No
color
charts
are shown.
Color charts are avoided because they are shortcuts (like answer sheets
in math) that do not teach thinking, experimentation, and "how to
solve problems". The best time to show the color chart is after
they have finished their paintings. At that point they can see
the rationale for the colors on the chart. If they were to use a
chart as a guide, how would they learn to solve problems by
experimenting?
|
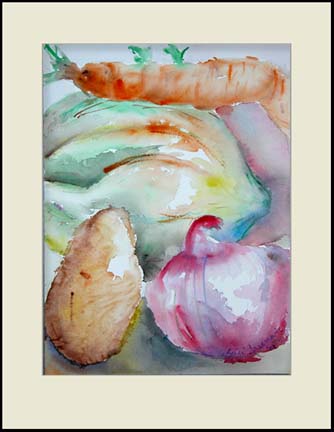
A one-hour
watercolor of a carrot, squash,
potato,
and onion by
Suzi
Arsenovic, college student
To make color mixing
essential, I select food items in the produce department that are
natural secondary colors.
There are many green, brown, purple, and orange veggies. This food used after the lesson
in my soups, stews, and salads. Students who ask are allowed to
select one piece to eat or to take home. For the
painting
the vegetables for observation are arranged by the students themselves.
They are encouraged to taste
and smell.
This provides rich multi sensory motivation. Plastic
fake foods
offer none of this.
LESSON
LIMITATIONS
- Use
a viewfinder to
frame the composition tightly enough so that objects pass over the
edges.
- Require
overlapping as they arrange their setups.
- They may only use primary and neutral pigments.
- Negative
area must be
painted first.
- Paint
it wet on wet.
- Add
detail as it dries.
- No
color may be used
by itself. Mix on paper by adding color on color on wet
paper.
- Combine
colors to adjust the colors closer to observed color.
- Encourage
"painterly" effects rather than smooth even tone.
- Begin
light.
- Darken
areas until a
full tonal range is developed.
- At
the highlight areas
on each object no paint may be used.
- Pure
paper tone highlights
are required. Shade the forms based on the lighting.
- Tie
the parts together
by looking for ways to repeat small amounts of each color in other
areas
of color.
- Darken
the cast shadows.
|
Not all right brain practice needs to be strictly observation.
Eugene
Stutzman, one of my students wrote and taught an exciting and creative
lesson for first grade children, but it could work with any age. In
this
lesson the room is outfitted with large mirrors set around the room so
the children see themselves. The students were all wrapped in sheets
of
white fabric. They are also set up with large brushes, 18 x 24
inch
paper and tempera paints. The room lights are turned off and
theater
lights with colored gels are orchestrated to music. The children
are then asked to paint their impressions of the experience without
showing
any people in their paintings. I recall one six-year-old boy
mumbling
about it. He said, "This is really stupid. This is really
stupid."
His comment was not typical. He looked around and and saw
everybody
else painting with abandon and great intensity. He proceeded to
make
one of the best paintings - without any people in it. After this this
lesson
children enjoy a discussion of the work of Helen Frankenthaler,
Grace
Hartigan or any of many abstract expressionists about whom it is often
said, "Any kid could do that."
how
to see patterns and textures
To draw well, students need to learn to observe patterns and textures.
This can be practiced by drawing wood grain, ears of corn, close up
views
of fabrics, or a pile of nearly anything. Repeat pattern and
texture
are often similar to each other, but pattern has larger units.
Texture
ads richness to surfaces. Pattern insists on being seen and can
produce
great eye movement in a composition by virtue of repetition.
How
to establish a practice routine
Some teachers start nearly every class session with a ritual or
practice
drill of observation drawing. Using these seven skills gives these drawing warm-ups
variety.
If you can think of anything that should be added to this list of
observation
skills, please share them. If you have any lessons that work well
to teach one these skills, let me know what it is. See Rituals
in the Art Classroom
Learning
by limiting
Lessons
without
limitations are not very effective. Without limitations, students
are prone to fall back on easy left brain habits and fail to practice
new
or difficult skills.
We naturally avoid the risk of doing the unknown unless a good teacher
assures us that the new way can help us grow. Well planned lesson
limitations make it harder for the left brain to dominate while
encouraging
the right brian to practice.
On the
other hand,
children who are encouraged and limited to follow patterns, color in
other
people's lines, do copy work, or assemble pre designed projects are
learning
skills that would be desirable in a society that needs lots of slaves.
Teaching from "how to draw it" books and by assigning copywork
and
patterns can be done by clerks. Anybody can handout
handwork.
In a society that needs self-motivated decision makers, their students
will grow up to suffer "learned helplessness". Good lesson
limitations
require individual learning of new skills, compositional and content
choice
making, challenging thinking tasks, and prohibition of stereotyping and
prejudices. See this
link for more ideas on making it harder for the left brain to
prevent
the education of the right brain.
|
|
Credits:
1 - Edwards, Betty. Drawing on the Right Side of the Brain. 1979. J.P.Tharcher, Los Angeles. Many of the concepts explained on this page were described by Edwards. Subsequent work in brain imaging substantiates the right-left brain theory.
2 - The rabbit lesson shown was taught by Goshen College art students,
Patty
Brown, Marlea Hershberger, Crystal Kempher, and Tiffany Wyse. We
appreciate
the cooperation of teachers, administration and especially the students
of St. John's Catholic School, Goshen, IN, for their cooperation.
All rights reserved. © 2003 Marvin
Bartel. You may
link this page to your page. You may review it and/or include properly
attributed short quotations in other publications. Teachers may make one copy for their own use. Any other use requires permission. Photos may not be published without permission. When you
request permission, please include the URL or Title of this
page. CONTACT
Goshen College students are permitted to make a copy
for their own use.
|
|
