|
RITUALS to Start an Art Class
by
Marvin Bartel, Ed.D.
|
observation
seeing
values and form
seeing
perspective
finding inspiration
practice imagination
claywork
Clay
Rituals
These are
not
art lessons. They are rituals to start the class. In many instances
they would be excellent beginning activities to help students understand
a more extensive art lesson.
Class or
Chaos
Rituals allow class sessions to start automatically and quietly.
As they come into the room, students know where to look to find materials.
They know which materials are needed. They know what to do after
they get the materials. Some teachers have the material list and
starting instructions on the board. Some teachers place a paper on
each worktable with a "map" of what is needed before the work can start.
By the time the teacher has checked attendance, the students are well along
with an on-task learning activity. At this point the teacher moves
around to assess progress, reinforce confidence, and ask questions to focus
student thinking as they work.
Blind
contour observation using "blinders"
Blind contour is done with
the pencil inserted through the middle of a 7 x 7 inch
blinder
card
(like a piece of old manila folder) so that students cannot see
the paper they are drawing on, but are forced to concentrate on the contour
(edge) of the thing being observed while the pencil moves on the paper.
It is done by drawing a slow continuous outline of the object. If
the line meets when it comes around the object, there is a chance the student
was not doing it honestly. Encourage them by saying, "It probably
will look funny and the line generally does not meet when you draw all
the way around the object." I kid them that they are "probably cheating"
if they get the line to actually meet.
This site shows
children
drawing with blinders
as well as their drawings. It works.
Actual Examples -----
-
For learning to draw from observation, blind contour drawing of 2
cosmos
flower petals
, one inverted, one from different flower
than the other, to insure variety of outline. Fine colored felt tip used
with 7 x 7 blinder card (pencil is inserted in a hole in the middle of
the card) on it to hide lines being drawn.
-
A detailed drawing of
one
thumb
from observation using a ball point pen.
-
To learn to see line character, a ball-point pen blind contour drawing
of a bent wire hanging in front of the room. It is bent to resemble a side
view of a face, but it is fairly jagged in the hair area and hung with
the nose downward so the face is not the apparent subject. After students
draw it they are asked to rotate their drawings until they find the face
right-side-up. They then add features on their own, but they are asked
to draw the added features of the face with the same
line character
that was used while drawing the original blind contour. All lines
are "look like" they were drawn from wire.
Blind
contour observation and tonal discrimination
-
Blind contour drawing of a row of 6 flower petals. Every other one is inverted.
They come from different flowers for variety of outline. They are made
into a value scale using a ball-point pen. Ball point pens are convenient
and very functional to learn hatching and cross-hatching as a way to create
tone.
-
For
learning to render tone
do
blind contour drawing using the pencil blinder (blind contour means to
slowly draw the perimeter without looking at the paper). Each student
draws a
one
or two inch pebble
lightly in pencil in a continuous line that
goes around the pebble - do not permitted sketchy lines. Ball point pen
hatching is used to develop the shading on the pebble and the cast shadow
from the pebble. Directional lighting is used. Pencil lines are totally
erased in the end product in order to show the role of tone without line.
Note: Number 1 above should be done prior to this ritual so the teacher
can remind the class about hatching method used in Number 1.
-
For
learning to render tone
and see that line is not essential to see form, a light pencil blind contour
drawing of an apple with one bite missing. Look down at the paper after
each line completion to place the pencil at the correct place for the next
line to begin. Use three fine felt tips to stipple the tones developing
the shadows, leaving highlights white. Do not outline the apple with markers.
Also stipple the cast shadow. Use any two related colors and the complement
of the related colors. Erase the pencil lines from the stippled drawing.

|
-
This study
of an orange slice was first drawn as a pencil outline from observation
of an orange slice. Next two colored felt tip pens were used to stipple
tone onto the drawing and add shadows. Finally, the pencil marks
were all erased to leave only the ink of the markers. It is drawn by a
college student.
-
When food
like this is used, ask students to use their
smell
and
taste
to enrich their motivation. Studies show that multisensory experiences
improve the quality of student artwork. You can see that a bit of this
slice is missing.
|
-
For reflections, observe a spoon, draw the outline contour (not the handle,
only the spoon). Next draw outlines of the lightest reflected areas and
label these as highlights. Next do the same for the darkest reflected areas
and label as darkest. Draw a second spoon and use hatching to tone it in,
leaving the highlight areas totally white. Make the darkest areas dark
and add the middle tones as you see them.
Learning
linear perspective by observation before theory
-
A cardboard viewfinder with a 3 x 4 opening is used to trace a 6 x 8 frame
on the paper with a cross grid running through it. Students tape string
in the viewfinder to make a cross grid in the viewfinder. They use the
viewfinders the draw one corner of the room where the walls and ceiling
meet. The vertical line of the corner is to line up with the vertical line
of the cross grid, but the corner is to be off center (beside and parallel
to the vertical string - not congruent with it).
They
draw the vertical corner line and the two ceiling lines at the correct
angles as observed in the viewfinder.
It is rendered on
the grid paper twice the size of the viewfinder. Follow with a discussion
of 2 point perspective, vanishing points, horizon line, eye level line,
and so on.
-
Use ruler-like mat board sticks to
find the angles and
the lengths of the outline of a simple large box
on the floor
or desk in front of them. They draw from measured lengths (marked on their
sticks) and matched angles. They then test to see if vertical lines are
vertical and if horizontal lines meet at logical vanishing points.
-
Another way to create viewfinders is to use a copying machine that can
make transparencies. Include a black frame with window that is divided
by bold black lines. The grid helps students observe measurements
and angles.
Practicing
Visual Memory
-
Place an unfamiliar object under a cardboard carton in front of the class.
Instruct the class to study the object for two seconds when you lift the
box off to reveal the object. Replace the box after two seconds,
hiding the object while they do a drawing of what they remember about the
object. The object needs to be unfamiliar so that students do not draw
from prior experience, but must observe and draw only from their short
term memory. An unfamiliar object might be something like a simple
sculptural assemblage of scrap materials created by the teacher.
Wood, metal, plastic, foam products, etc. can be glued or even taped together.
A lump of clay can be easily shaped into something fairly simple but unfamiliar.
-
Use the same object the following day in the same way. If you plan
to do this, do not allow the students to see the object after the first
drawing. See if their drawings improve after a second two second
observation.
-
For comparison purposes, use the same object for a blind contour drawing
ritual.
-
Ask for a memory drawing of the object one week later without allowing
them to see either their drawings or the object.
Learning
to look for sources of inspiration
-
For sources of inspiration from capricious events, give out a
paper
on which tempera paint has been mashed
against another sheet
(not folded to give the standard symmetrical design, but the 2 parts are
given to 2 different students). They are to use their ball points to develop
and add subject matter based on anything they are able to see in the paint
blotches. Green and orange paint was used. Note capricious events as source
for creative ideas and inspiration.
-
For sources of inspiration from
capricious events
,
give out a 6 x 9 piece of paper and 5 random different sized strips of
black paper. They place the paper on the floor and drop the strips until
they are all at least partially on the paper. They must then study the
composition and improve it as much as possible by only moving one of the
five strips of paper. Glue them in place with glue sticks. Note the desire
and ability of all the be aesthetic organizers. Verbally note the value
of capricious events (accidents and mistakes) as source for creative ideas
and inspiration.
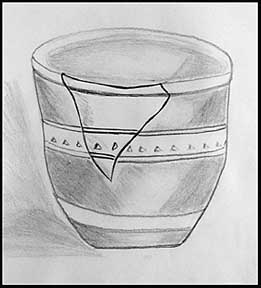
Learning
to practice the imagination based on an observed object
A shard
from a tribal cooking pot.
|
-
Each student selects a pottery shard and a marble size piece of clay or
similar material. The clay is used to mount shard fragment in the
position that the student thinks it might have been in the complete pottery
piece that it may have originated from. Using a blinder on their
pencils so that the drawing paper is not visible, they draw a light continuous
outline of exterior side of the pottery fragment. Next a ballpoint
pen is used to add the value scheme to the drawing (no ink outlines are
permitted - only hatching to create shaded areas). Erase the outlines
formerly drawn by the pencil.
-
Using a pencil, use the imagination to create the rest of the pottery form.
-
OTHER POSSIBILITIES: Write a short story about the original user or maker
of the pot. Bury the shard (or imagine that you are doing this) 5
inches underground in the backyard of where you live and write a short
story about the person who finds the shard 100 years from now.
Left:
The V shaped portion at the top of this drawing was drawn by
obersvation
from the pottery shard above it. The remainder of the form was invented
from the student's
imagination
. We note that the student was aware
that the top of a round form is represented by an oval. However, as is
typical before students master drawing from observation, the line representing
the base is flat (or straight). The left brain knows that the base
is to be flat on the table. It does not realize that a correct observation
would draw the front portion of the base as a half oval (curved).
Those who have learned to draw, know this, and even in their imaginary
renderings, they show show it.
|
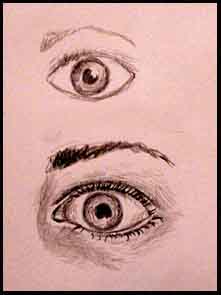
Learning to
compare memory with observation
For sources of inspiration from memory vs. observation,
students draw an
eye
from memory. Distribute
4 x 5 mirrors. Next draw a an eye from observation. Compare and note
the benefits of real information vs. dependence on memory.
Even
things we see everyday, are not totally memorized. The top eye is drawn
from memory by an adult. The bottom eye is then drawn by the same
adult while using a mirror to observe her own eye. The next time this person
draws an eye from memory, she will have learned more about the parts of
her eye.
This drawing is by a college student
|
|
Clay
Work
on a Small Scale can be used as a Classroom Ritual
Learning
to observe and create in three dimensions
-
Small clay
birds
are made and recorded with
blind contour drawing.
See
details by clicking here.
-
Clay sculpture: A student brings in an
animal.
Students each examine the animal by holding or at least feeling it. They
have a small piece of clay with which to model a small animal.
See
WHAT
SKILLS ARE NEEDED TO DRAW EVERYTHING?
© 2003
for
more ideas by this author
See
more
essays ideas for art education
by Marvin Bartel
See
Art
Lessons
by Marvin Bartel
to Marvin Bartel
Art
for Children and Secondary School Art
art education home page
back to Art
Rituals
in the Classroom Essay
Also see:
Sources
of Art Lesson Ideas
|
Planning
to Teach Art Lessons

Search
Goshen College
web pages
All rights reserved. © Marvin Bartel.
Goshen College students may print a copy for their own use. Others
must request permission to copy or publish. Mention the URL or the
title of this page in your correspondence.
Layout and text © 2000
Updated: January 2003
E-mail Marvin Bartel
|