|
Observation
Drawing
|
The Objectives:
-
Practice observation drawing because children who gain drawing
confidence through observation practice will less likely have the crisis
of confidence. A crisis of confidence about drawing tends to
extend to other aspects of art and is very common among children and adults
in our society.
-
Encourage creative work habits.
-
Change habits of work by selecting things that can not easily
drawn from memory.
-
Learn about significant art history, art criticism, and aesthetics.
NOTE: To assure
observation, do not show any examples or any artwork from art history
until near the end of the lesson after the students have completed their
own work.
Age and Grade
Level
This is a good lesson for grades three to adult. This lesson
is best above second grade, but younger children do well with it if the
blinder is not used. Younger children do well if they are encouraged to
study each shape carefully before drawing it. I find that it is okay
to encourage them to make lots of mistakes and draw over the mistakes so
they can learn more. I tell them that I always make mistakes when
I am learning a new thing. That is how I learn it. I tell them
that when they are finished, they may erase the parts that are not as good,
but leave the lines they like best. These instructions help them
overcome the fear of failure.
Media
-
Distribute the materials before discussing
the process and giving drawing directions. This is avoids disrupting
them when they are ready to start working.
-
Use any drawing media that students are already
familiar with. Select paper that is large enough for the drawing
tools and art media being used. For charcoal, pastels, oil pastels
and paints you could use 12 x 18 or larger. If they work with drawing
pencils, ink, ball point, or with small brushes, use a smaller size if time is limited. This might depend on the the age and prior experience
of the students.
Review and Introduce
The teacher briefly reviews previous lessons
that have been similar or related to this lesson. The teacher gives
a brief introduction and explains what is going ot happen and explains
a few things that will be practiced and learned in this lesson.
In this lesson the rabbit was kept secret and hidden until it was used.
This avoided distraction before they were ready to draw it.
Preliminary Warm-up
-
Students place their 6B soft lead drawing
pencils through a hole in the middle of 8 x 8 inch card which serves as
a blinder preventing the temptation to look at their paper.
-
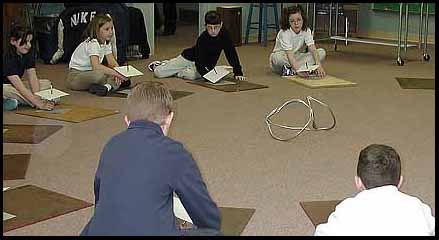
The class does some warm-up practice blind
contour drawings of something they have never
seen before. Here a piece of soft aluminum cable is used
because it can easily be bent into new shapes. It is easy to follow
because it is linear.
|
By using an unfamiliar subject, the teacher
can be confident that students will not draw from memory, but they will
actually want to observe the lines and shapes they see.
|
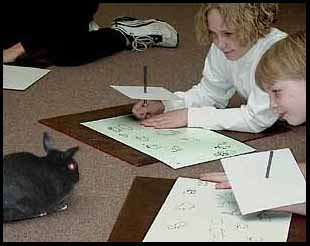
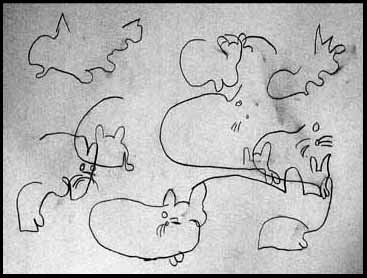
- Here a pet rabbit is allowed to roam the room.
The rabbit becomes the subject of more practice blind contour drawings.
-
Students are asked to continue their lines
when the rabbit moves, allowing unconventional renderings. This gives
them "permission" to make "individual" renditions.
-
Below is a sheet of these practice observations.
|
|
 |
A
live animal is very engaging and creates very strong attention and motivation.
We are naturally drawn to animals. They are probably one of the best
subjects to use for an art assignment.
Teachers need
to check to be sure no children in the class have an allergy to a particular
animal and they need to make sure school policies do not prohibit animals.
|
Final Project
-
Students use a new sheet of drawing paper.
-
They are asked to make a larger drawing and
attempt of fill the paper.
-
They are allowed to try several times until
they get an outline they like.
-
Using crayons, they are encouraged to add
the texture and tone (values) they observe.
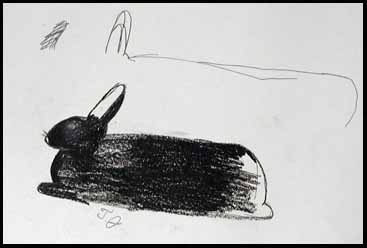
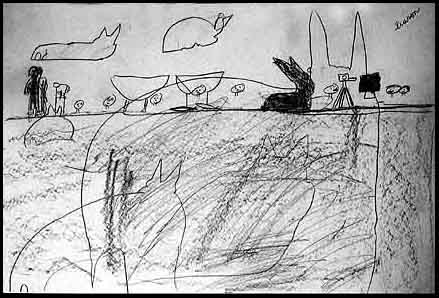
The drawing
below by a third grade student is unique in that the student drew the whole
scene including the children on the floor, the teacher standing on the
left and the camera on a tripod at the right. |
This drawing by a third grade student
shows that the student felt free to start three times, each time making
an observational improvement.
|
 |
Displaying
Work
Be inclusive and educational.
-
Include every child's
work each time or at least use a fair rotating basis.
-
Public displays need
to include the teacher's goals and objectives
to help educate other children, teachers, parents, administrators, cleaning
staff, and others who may wonder what is being learned.
-
Teach children how to
put up these orderly well designed displays by themselves.
|
Discussing Student Work (the
dreaded critique)
-
The teacher's main
roles are to ask questions and
reinforce
articulate comments from students. Some
teachers find this difficult because it is so easy to see mistakes in student
work and talk about them. When we make suggestions or when we say
what is 'wrong' with the work, we are implying that art is supposed to
look a certain way. Too often this is simply the teacher's way.
-
Students must be allowed ownership.
Students do not make perfect work, but they make real work that reflects
their own efforts. There is a lot to learn from student efforts without
being negative.
-
In a negative and judgmental environment they
tend to do as little as they feel they can get by with. They ask,
"Is this good enough?"
-
They should ask, "What else does it need?"
At this point the teacher does not make a suggestion, but turns the question
back to the student, "What are some things you can think of?" "What
part is working best for you so far?" "Good. How could you make the
rest work that well?"
-
Try questions like:
"What do you notice first when you look at this one by . . . . "
"Why do we notice that?" "Did somebody notice something different?"
"Can somebody explain the reason for that?" "Which is one of most
original approaches you see?" " What is different about it?"
Do not allow negative remarks. When a positive remark is made, ask
for elaboration. Be sure reasons are articulated. Use a lot
of encouraging comments like, "Very good, thank you for explaining that."
-
It can be good to speculate about the meaning
of their pictures (interpretation). Making up titles helps with this.
After others have given their ideas, give the creator a chance to give
an answer.
-
We can ask about the
art
elements and compositional principles in the work. "Can somebody
find an example where somebody used contrasting size to make something
more important in the picture?" "Is there an example where somebody
used several different textures to make a picture look more interesting?"
-
Sometimes, use written
questions, but also ask the students to write open questions that
can be answered several ways.
-
Ask the students, "What
are your ideas for other kinds of art projects you could do now to learn
more about what you just learned?" "What could you do now to practice
so you get even better at what you just did?" Art is a life-long
thought process and practice. We never arrive, we are on journey.
We are in a search.
-
If discussions are too
long, try working with small groups as they finish their work. Or,
try a rotation system where you only discuss one third of the works each
time, but all students get equal turns.
 |
Art History
-
After completing their
own work, students will be interested in seeing how other artists have
approached similar subjects.
-
After drawing rabbits,
they will notice more about Albrecht
Durer's rendering of a Young
Hare.
-
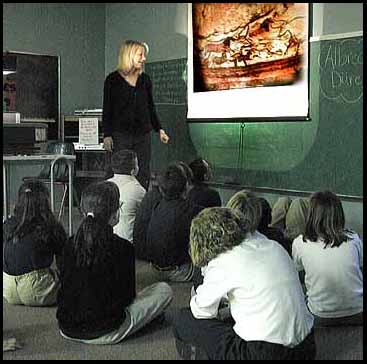
On the left the class
is discussing prehistoric animal drawings that were discovered in caves
in France.
-
In addition to "What
do you notice" and "why" questions, students can be asked to speculate
about reasons these animal drawings were created.
-
After exhausting the
student ideas, a teacher could also add what "some people think" about
the reasons.
NOTE
on IMAGE SOURCES
|
Art in Everyday
Life and Review Again
Review is very efficient use of class
time. Sometimes there is a minute or two after cleanup time before
the bell rings. Even if the bell rings before a question is answered,
it is still good to raise the question.
-
"In what country would you find very old animal
drawings in caves?"
-
"How are cave drawings and graffiti we see
on train cars similar and different"
-
"If the animal drawings in the caves were
about hunting for food, what could we draw to put on our walls in our cafeteria
about how we get our food?"
-
"How does a contour line feeling change as
you change the speed of your hand motion when you draw?"
-
"What skills other than drawing are useful
for artists?"
-
"Can you describe an example of when expressionism
is more artistic than realism?"
Review is even more effective if it is repeated
at the beginning of the next session a day or more later. When a
teacher expect students to remember things from session to session, students
thinking habits can be encouraged to remember.
Credits:
This lesson was inspired by a similar lesson developed and taught by Goshen
College art students, Patty Brown, Marlea Hershberger, Crystal Kempher,
and Tiffany Wyse. We appreciate the cooperation of teachers, administration
and especially the students of St. John's Catholic School, Goshen, IN,
for their cooperation.
|
Practice
Works. Those that do not
draw, do not learn to see very carefully. Those who do not know how
to observe, are bad at drawing. They stop drawing because they find
it discouraging. When they stop drawing they never learn it.
Viktor Lowenfeld,
the famous art educator who wrote, Creative and Mental Growth, said
some children were haptic instead of visual. He encouraged them to
be expressive instead of realistic in their artwork. Competent visual observation
did not seem to matter to him as long as children were being expressive
and creative.
In my experience
the children themselves never believe that observation drawing skill does
not matter. Why should they?
It would be like
saying those who have not naturally learned to read and write on their
own are just wired differently, so we should just teach them to talk and
sing instead. Forget writing and reading. When we neglect to
teach observation drawing, I believe we neglect basic brain development.
I am experimenting
with children as young as four. I know a child who is five and has
learned to use a blinder to practice observation blind contour drawing
before she attempts to make her actual drawing. Her blind drawings
are just for practice, but it is amazing how much she sees and includes
in her "real" drawings. When you are five, this is not strange or
unusual. It is just like learning to read, if you are instructed
this way, it seems very natural. Amazingly, it works.
Of course not every
drawing should be from observation. Memory and imagination also need
lots of practice. Young children need encouragement. I make
a practice to never correct them. I never draw for them to show them how
I draw things. Such "help" only makes them doubt their own ability
and they stop working. |
© This lesson was written by Marvin
Bartel, all rights reserved. You are invited to link this page to
your page. For permission to reproduce or copy photos, text, or layout,
or to place this page on your site or to make printed copies, e-mail: marvinpb@goshen.edu
Goshen College students are permitted to make a copy for their own use.
Marvin Bartel, Ed.D., Professor of Art
Goshen College, 1700 South Main St., Goshen IN 46526
fax: 219-535-7660
updated: December, 2001
NOTE on IMAGE
SOURCES
One way to
show copyrighted Internet images to a class is to use a computer projector
or large computer monitor and show the actual web page to the students.
This would not be making a copy and would probably be legal for educational
use (but not for business use). If this is not feasible, it is possible
to make a printed transparency of an image for limited classroom use for
a spontaneous need. In any case, the publisher should be credited so the
source is projected with the image. If an image is used on a regular and/or
repeated basis, the teacher should ask the school to get written permission
and/or purchase authorization, or purchase a reproduction or slide. The
last thing a teacher wants is for the school to become the plaintive in
a copyright case. Printed reproductions offer an advantage over slides
in that they can be displayed for a time in the classroom. Some art teachers
make a practice of checking out several beautiful art books from the public
library for their their students to enjoy when they finish their work.
This is free and legal.
Technically,
it is quite easy to take images from most web sites. Using a web
browser, one simply holds down the right mouse button
on an image to save it as a .jpg. On a Mac operating system, one
simply holds the main mouse button until the dialog box appears.
Of course lots of things are possible that are not legal.
If anybody
who is more experienced with copyright law reads this, please e-mail me
and I will try to correct any errors.
CLICK
HERE
For more about
how to "copy" an Internet image for teaching
marvinpb@goshen.edu
This is an online book of eight
drawing lessons

|
|